Table Of Content
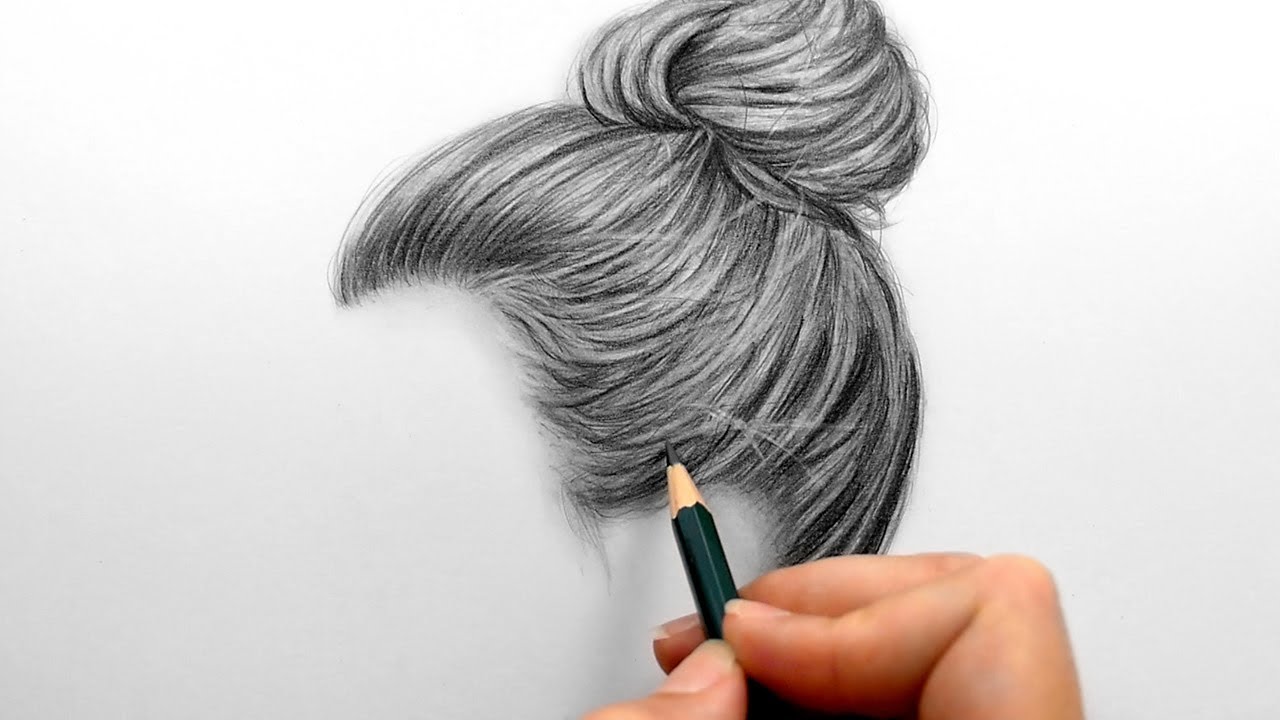
For each layer of graphite that we apply, we'll use a blending stump to work the medium into the tooth or texture of the paper. This will help to create the impression of softness and smooth any inconsistencies produced by the softer graphite applications. We also know that areas that recede or are blocked from receiving light should be darker in value.
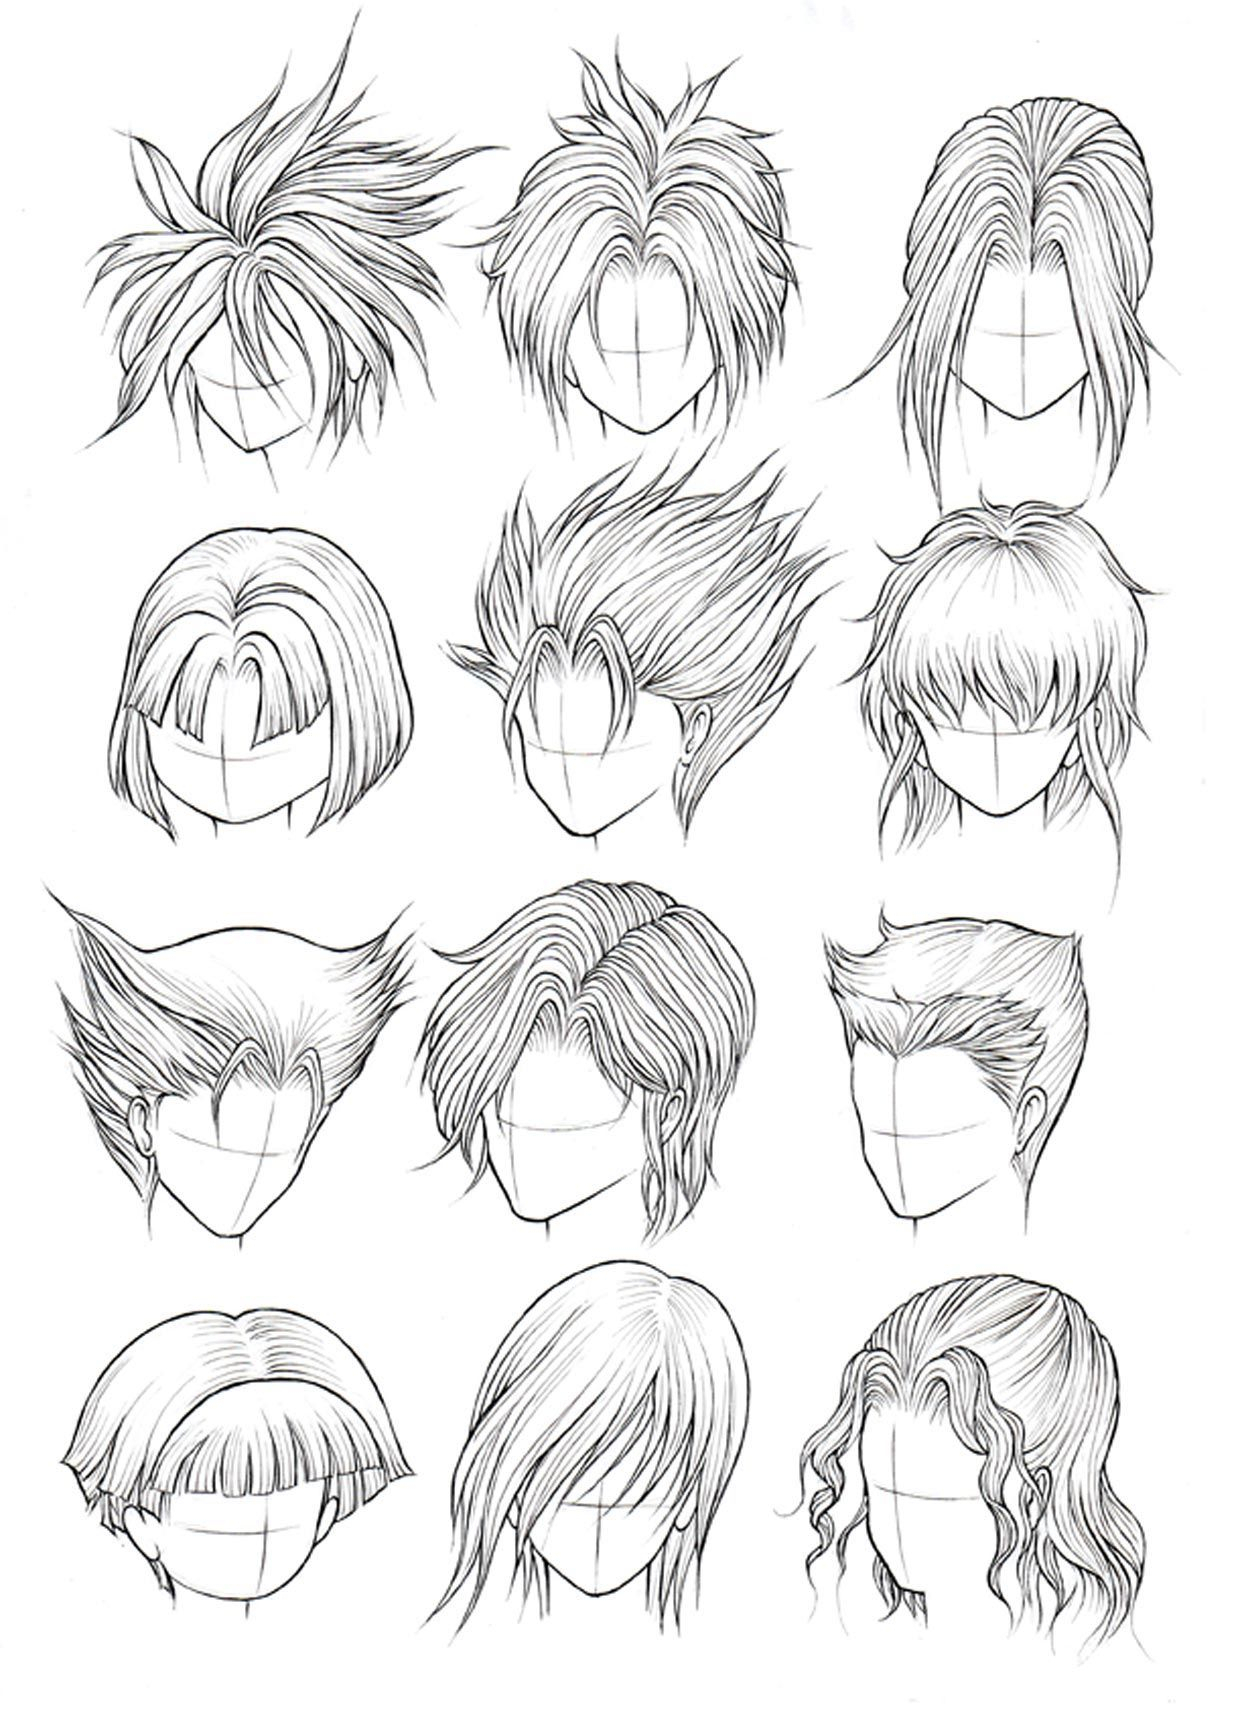
How to Draw Hair Step by Step Tutorial
An average human head contains around 150,000 strands of hair. First of all, you don’t need to spend 90% of your time meticulously drawing your subject’s hair. In fact, this step can be done so quickly it might even become your favorite step.
Laying the Groundwork: Initiating Braid Drawing with Fundamental Shapes
Escondido exhibits tell the black hair story - The San Diego Union-Tribune
Escondido exhibits tell the black hair story.
Posted: Fri, 15 Jan 2016 08:00:00 GMT [source]
It helps to make loose outlines of the skull before you start drawing hair. If you draw hair without the 3 dimensional shape of the human head in mind, it will lack volume and you risk chopping off a part of the skull. For most people with long hair, you can expect at least 2 centimeters of “hair height” on top of their actual height and at least 2 centimeters on the sides as well. I am using my kneaded eraser just as much as I use my pencil throughout this drawing. It's a fantastic tool for drawing hair because it can be used to pick out specific details, or to lighten larger areas of value. Watch this video tutorial on my three favorite kneaded eraser techniques for realistic drawing here.
Finessing the Process: Layering the Details in Braid Drawing
In an Instagram post earlier this year, she showed how Garner’s ideas have shown up in the creations by the likes of Jeremy Scott, Fendi, and Miu Miu. Content on this website is copyrighted by Darlene Nguyen. The use or reproduction is strictly prohibited unless prior written consent from the artist is obtained. By studying and observing real-life examples, you’ll be better equipped to recreate them on paper. Observation is always paramount to your success no matter what approach you take or method you choose to use.
The shaft is the visible part of the hair, while the root is the part embedded in the skin. The follicle is the structure that surrounds the root and nourishes the hair. I appreciate your skills and style in elaborating on the topic.
Dying Curly Hair with Creativity and Care
This isn’t a tutorial, but it does provide you with lots of hairstyle ideas for boys. If you want to learn how to draw hair, I hope the step-by-step drawing tutorials will teach you how to do so. Begin by drawing the outline of the outside of the hair.
The four step approach that we explored above can also be used for a single lock of hair... You may start by taking a photo of someone's hair - perhaps your own. Look for a defined collection hair that forms a shape. To finish up, we'll add a few stray hairs that extend from the body of the hair. These stray hairs can be made with quick deliberate marks with a sharpened HB pencil.
Join art communities or online forums where you can share your work and receive valuable insights from others. Negative space refers to the areas around and between objects. When drawing hair, pay attention to the negative spaces between the strands and use them strategically to define the shape and volume of the hairstyle. To achieve a realistic appearance, focus on creating volume and texture.
Two $1M artworks returned to NYC kin of Holocaust victim with the help of Manhattan prosecutors - New York Post
Two $1M artworks returned to NYC kin of Holocaust victim with the help of Manhattan prosecutors.
Posted: Fri, 19 Jan 2024 08:00:00 GMT [source]
For digital artists, work with separate layers for each drawing stage or color. This method allows easy adjustments and layer toggling without damaging your work. Lower the opacity of your base layer, draw over it on a new layer, and keep refining. Understanding the nuances of braid drawings is crucial to capturing these complex structures in your artwork. Drawing curly hair is really fun and absolutely great for building confidence when it comes to adding texture. Inside the construction frame from the previous step begin drawing in some of the more organic shapes and folds of the hair.

Read on for a detailed guide on outlining, sketching, shading, highlighting, and more. Creating realistic drawings of hair is undeniably one of the most challenging tasks for artists of all skill levels. When it comes to mastering the art of illustrating hair in its many forms – straight, curly, short, long, thick, or thin – the intricacies can be overwhelming. However, imbuing your artwork with well-rendered braids can elevate the overall aesthetic appeal of your creation. The examples in this tutorial can give you a good basic idea of how to draw some common hair types.
Same as the other example begin by drawing an outline of the entire shape of the head. Finish the line drawing by adding the smallest set of details. Again add in the hairline over top of the head drawing. Refine the shading by creating smoother gradients between the mid tone, light and “in shadow” areas of the hair. To avoid your drawing getting overly clutter erase the parts of the head covered by the hair after you are done.
To do this, move your pencil to the hair part and draw several lines in the direction of where the hair grows. These lines can vary in length, from long to short, just so long as they follow the hairstyle. Adjust your drawing tools and techniques to reflect different hair textures. Use distinct, sharp lines for coarser hair and smoother, more consistent lines for finer hair. Online tutorials can guide you in drawing various hair textures and braid types. Work on one part of the hair at a time, while following the general direction in which the strands flow.
In the late 1980s, she proposed a tie that braided the hair together, providing an even closer precedent for the Schiaparelli design. If you want to create a shiny look or replicate harsh lighting, try to keep the highlights fairly clean. Click here to learn how to draw one from the front and here to draw one from side. Same as the previous example begin by making an outline drawing of the head.
It doesn't makemuch sense to go into more detail at this point because I will lose someof my drawing when I start drawing in values. However, just because Iam moving to value drawing does not mean that the block-in stage isover. • The little strands on Step 3 follow a very similar direction, but slightly more pronounced, enough to add dynamism to the shape of the hair clump. As my drawing advances, I ponder some possibilities for drawing the hair. This character will have straight hair, cut just over the shoulders.


No comments:
Post a Comment